Model Context Protocol (MCP) is an open standard that defines how AI models interact with external tools and systems. Instead of relying on prompt hacks or application-specific integrations, MCP provides a structured, machine-readable way to expose capabilities such as data access, document retrieval, or system queries to a model. If you are interested in learning more about MCP, we recommend looking at this in-depth MCP course from HuggingFace and Anthropic.
In this workshop, we will run a small MCP server and connect it to Open WebUI, giving the model controlled access to a useful capabilities. You will see how tools are discovered, how the model decides to call them, and how structured results flow back into the conversation. The goal is to understand how MCP enables reliable, reusable tool use and forms the foundation for building real agents.
Setting up the environment
We will start by preparing a Python virtual environment using uv. We use uv, as it is a modern, high-performance tool that manages virtual environments and installs Python packages directly from PyPI. In this workshop, we use uv to simplify setup, ensure reproducible installs, and keep everything fast and consistent within a single, easy-to-use workflow.
Follow the steps below to prepare your environment with
uv. For each step, copy the code and paste and execute it on the command line of your compute instance.
- Step 1: Install the
uvenvironment manager:curl -LsSf https://astral.sh/uv/install.sh | sh source $HOME/.local/bin/env - Step 2: Create and activate your virtual environment
uv init tools_server cd tools_server uv venv source .venv/bin/activate - Step 3: Install the fastmcp package that we will need to launch our MCP server. Additionally, we install pandas as we will need it in the tool we set up.
uv pip install fastmcp
uv pip install pandas
uv pip install requests
This sets up an isolated Python environment where we can safely install dependencies without affecting the system Python.
Launching the tool server
We will now set up a lightweight tool server using FastMCP. This server will allow you to run Python tools that add new functionalities to your LLMs. Specifically, we will now add a tool that can perform analyses on a small sample CSV file regarding employees. In the next section, we provide different exercises for different tools you can add. We will now first create a Python file which loads the data and provides the functions for analysing the data. The code is explained in detail in the additional information. Then, we will launch the tool server and configure our Open WebUI instance correctly.
- Open a new Python file with
nano tools.py- Copy the code below into the file, and exit and save through
ctrl + O, enterfollowed byctrl + X
Show tool code
# fastmcp_user_tools_descriptive.py
from fastmcp import FastMCP
import pandas as pd
from datetime import datetime, date
import requests
import io

# Initialize FastMCP
mcp = FastMCP("user-tools-demo")

# Download CSV from Google Drive
CSV_URL = "https://drive.google.com/uc?id=1VEi-dnEh4RbBKa97fyl_Eenkvu2NC6ki&export=download"
try:
    response = requests.get(CSV_URL)
    response.raise_for_status()
    df = pd.read_csv(io.StringIO(response.text))
except Exception as e:
    raise RuntimeError(f"Failed to download CSV: {e}")

# Preprocess columns
df['First Name'] = df['First Name'].str.strip().str.lower()
df['Last Name'] = df['Last Name'].str.strip().str.lower()
df['Job Title'] = df['Job Title'].str.strip().str.lower()
df['Sex'] = df['Sex'].str.strip().str.lower()
df['Email'] = df['Email'].str.strip().str.lower()
df['Phone'] = df['Phone'].str.strip()

# Convert Date of birth to datetime
df['Date of birth'] = pd.to_datetime(df['Date of birth'], errors='coerce')

# ------------------ Tools ------------------

@mcp.tool
def count_by_first_name(first_name: str):
    """
    Count the number of males and females with a given first name.

    Parameters:
    - first_name (str): The first name to search for (e.g., 'Alice'). Case-insensitive.

    Returns:
    - dict: {"male": int, "female": int}
    """
    first_name = first_name.lower()
    males = df[(df['First Name'] == first_name) & (df['Sex'] == 'male')].shape[0]
    females = df[(df['First Name'] == first_name) & (df['Sex'] == 'female')].shape[0]
    return f"There are {males} men with the first name {first_name} and {females} women with the first name {first_name}"

@mcp.tool
def count_by_job_keyword(keyword: str):
    """
    Count the number of males and females whose job title contains a given keyword.

    Parameters:
    - keyword (str): Keyword to search for in job titles (e.g., 'engineer'). Case-insensitive.

    Returns:
    - dict: {"male": int, "female": int}
    """
    keyword = keyword.lower()
    males = df[(df['Job Title'].str.contains(keyword, na=False)) & (df['Sex'] == 'male')].shape[0]
    females = df[(df['Job Title'].str.contains(keyword, na=False)) & (df['Sex'] == 'female')].shape[0]
    return f"There are {males} with a job containing the keyword {keyword}, and {females} women with a job with the keyword {keyword}"

# ------------------ Run Server ------------------

if __name__ == "__main__":
    mcp.run(transport="streamable-http", host="0.0.0.0", port=8000)
Executing the python file would block your terminal, not allowing you to do anything else on the instance. Therefore, we will use tmux, which allows you to run multiple terminal sessions inside one window. It allows you to keep processes running in the background and reconnect to them later. If you want to know more about the options in tmux, have a look at this cheatsheet.
- Start a tmux session with
tmux new-session -s mcp- Activate the environment:
source .venv/bin/activate- Start the tool server with
python tools.py, then detach from the session withctrl + b, dWhen you want to re-attach to the tmux session, you can usetmux attach
Configuring the tools in Open WebUI
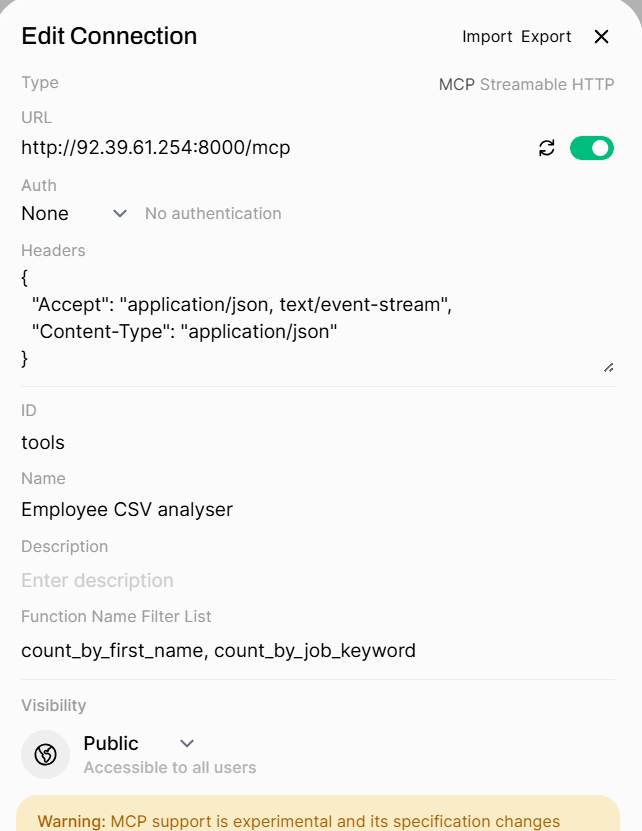
Next, we will connect our tool server to Open WebUI. Follow the steps below to achieve this, also see the image below for further context.
- In Open WebUI, go to
Admin panel -> Settings -> External Tools -> + icon next to Manage Tool Servers- Fill in the fields as follows:
- Type: MCP
- URL:
http://<YOURIP>:8000/mcp(replace<YOURIP>with your server’s IP address)- Auth: None
- Headers:
{"Accept": "application/json, text/event-stream", "Content-Type": "application/json"}- ID:
tools- Name/Description: Here you can give the tool server a name and a description
- Function Name Filter List: Here we enter the function names, in our case:
count_by_first_name, count_by_job_keyword
Using the tool in Open WebUI
Once we configured the tool correctly in the admin settings, we can start to use it in the chat. In the box where you enter the prompt, click on the icon integrations, and toggle on your MCP in the tools section. Below are a few prompts you can try out, but feel free to give them your own spin and test the limits of the LLM!
How many women are there with a job related to the keyword “teacher”?
How many men have the first name “Peter”?
What’s next?
You now know the basis of MCP servers, if you want to experiment yourself with different types of tools and data, have a look at the next section.
Author: Alexander Sternfeld